RTM-Worx Overview
Material and process data
Data needed to run a simulation
For a flow simulation with RTM-Worx, not much data is needed to get started. You can do a quick test very easily without any fabric properties because RTM-Worx is also capable of simulating Hele-Shaw flow in a mould without reinforcement.
Part geometry, location of injection and venting ports
Dimensions of the part need to be known in order to define a surface model (shell-like structure).
Importing files from other applications is also possible (DXF, STL, PATRAN).
The location of injection and venting ports needs to be defined to do a simulation, but is
typically optimised with RTM-Worx. A few reasonable alternatives will provide a good start.
Fabric properties:
- porosity of the fabric
- major and minor in-plane permeabilities.
- orientation of the reinforcement
For lay-ups of different fabrics, or of an isotropic fabric with different orientations in each
layer, a volume-based rule of mixtures is used.
Resin properties:
Only the viscosity of the resin at processing temperature needs to be known because the simulation
uses a constant viscosity during filling of the mould.
Fabric and resin properties
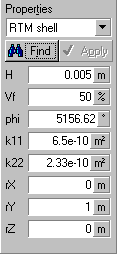
 Fabric properties (porosity, minor and major permeabilities and the reference direction) are
entered as attributes of surfaces and easily added, removed or changed by selecting one or more
surfaces (click with the mouse in selection mode), entering the right values in the control panel
and push the 'Apply' button. Surfaces without fabric properties are considered
'hollow'. When the thickness is not defined or zero, a surface is effectively
impermeable.
The lower part of the 'Surface editor' control panel, if you select the RTM shell property
set for a surface, is shown at the left.
The accuracy of the prediction of the filling time is linearly related to the accuracy of the
permeability and resin viscosity. Typically, the error in those material parameters is an order of
magnitude larger than the numerical error. However, the (qualitative accuracy of the) filling
pattern only depends on the geometry and relative differences in permeability and is generally
much more accurate. You can do a simple experiment, like injecting a strip, to determine the
permeability for a reinforcement when the resin viscosity is known. When permeability or viscosity
is not exactly known or when you expect large variations you can use RTM-Worx to determine bounds
on the injection time by doing repeated calculations with low and high values for the
permeability. When there are constraints on the injection time, you can use RTM-Worx to get a
specification for the permeability and viscosity.

![[top]](../asp/tp.gif) Injection and Venting ports
Injection and Venting ports
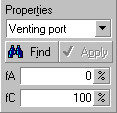
Any keypoint can be turned into an injection point or venting port and vice versa. Venting
ports have the following user definable settings:
- fraction of fill at which the port opens (fA);
- fraction of fill at which the port closes (fC).
![]() When venting
ports (or injection points) are closed, they behave like an ordinary keypoint. A venting port is
visualised as a blue (default color) cross as shown here.
When venting
ports (or injection points) are closed, they behave like an ordinary keypoint. A venting port is
visualised as a blue (default color) cross as shown here.
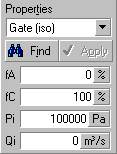
 Injection ports have the same settings as venting ports and in addition:
- prescribed (maximum) pressure (Pi);
- prescribed (maximum) flowrate (Qi).
A different symbol (resembling a '+') is used to visualise injection ports. It is shown
red (default). ![]() When both flowrate and pressure are defined, the pressure is used as a maximum and the flow
is pressure controlled when the prescribed flowrate would lead to a higher pressure. The opposite
happens when the flowrate exceeds the prescribed flowrate, the flowrate will be prescribed and the
pressure is calculated. If neither pressure nor flowrate is defined, an injection port acts like a
venting port (and is displayed using the venting port colour).
When both flowrate and pressure are defined, the pressure is used as a maximum and the flow
is pressure controlled when the prescribed flowrate would lead to a higher pressure. The opposite
happens when the flowrate exceeds the prescribed flowrate, the flowrate will be prescribed and the
pressure is calculated. If neither pressure nor flowrate is defined, an injection port acts like a
venting port (and is displayed using the venting port colour).
home |
introduction |
requirements |
user interface |
geometry editor
mesh generation |
pre- and postprocessing |
file system |
calculation
© 1997-2022 Polyworx
![[home]](../asp/pwxpwx.gif)